 This is the quintessence of spring. At once fresh, creamy, cool, sticky and soft, this dessert encapsulates the ephemeral season of the strawberry. My husband has been known to marvel at how this pretty berry is showcased here – he insists that the flavour is so true that it tastes “fake”. No trickery to be found here, which is also true of the process. Set aside a full morning or afternoon for this bad boy, and assemble everything you’ll need before you begin. This recipe makes use of lots of equipment, techniques, and patience, and while it’s tempting to skip steps or leave things out, the finished product is so fantastic here you really shouldn’t. I used to make this without the finishing touches of meringue and glaze, then, finally having committed to seeing the whole thing through to completion, I kicked myself for all the times I’d made it without. This luxurious dessert is so much greater than the sum of its parts. Enjoy the making; the eating is a celebration of the literal fruits of your labour. And speaking of fruits: I made the mistake once of making this cake with gargantuan, bulbous strawberries from a local farm, thinking that bigger was better…I subsequently made another with smaller, more refined berries and kept the giant ones for eating. Small berries are infinitely better suited to this dessert.
I’m choosing here to list the ingredients for each component followed by the method; keep scrolling to make sure you know exactly what you need to do! This recipe is adapted from the one in Christophe Felder’s Patisserie; I have not changed much but the changes I’ve made are important.
Kirsch Syrup
1/3 cup sugar
1/2 cup water
2 tbsp kirsch
Combine the sugar and water in a small saucepan and stir over medium heat until the sugar has dissolved. Let it cool and then stir in the kirsch.
Genoise
1 cup all-purpose flour
6 eggs, separated
3/4 cup sugar
1/3 cup icing sugar
Preheat your oven to 350 degrees Farenheit. Line 2 baking sheets with parchment.
Sift the flour.
Whip the egg whites at medium high speed until they are foamy.
Add the sugar gradually and whip until the egg whites become firm and glossy, but not dry.
Add the egg yolks and give it a quick whip on high, just until the yolks are incorporated and the mixture is smooth.
Fold in the sifted flour in thirds, using a flexible spatula. Make sure you fold all the flour in – it can hide in pockets throughout the batter.
Divide the batter between the prepared baking sheets and spread it out using a thin spatula. (An offset spatula, usually used for frosting, works great here.) Try to approximate the same size and shape on each sheet – it will mean less trimming (and less waste!) later. You’re trying here to make the genoise as thin as possible without making it into a wafer, so you should aim for spreading to somewhere between 1/8 and 1/4 inch. Sift the icing sugar over each genoise, aiming for full and even coverage.
Bake each sheet one at a time (just leave the other on the counter to wait its turn) for 10-12 minutes, until very lightly golden. Rotate the pan halfway through baking. Really you want this just barely gold because you don’t want it to dry out to the point of being hard. Once it’s out, transfer the cake along with the parchment to a rack to cool.
Now this part is optional – using a cake ring here (a square or rectangular one) will give you impeccable, perfect results, and it will help in the assembly. It is not, however, completely necessary. In fact, not using a cake ring has its own charm: it means there will be more to trim later, which means an impromptu tea party for you and anyone lucky enough to be around.
Crème Mousseline
*This cream is a combination of buttercream and crème pâtissière, so I am listing those recipes separately. They are each incredibly useful on their own.
Buttercream
*This buttercream makes use of whole eggs that are separated and then whipped and tempered with sugar syrup. It begins with an Italian meringue and is followed by an egg yolk buttercream, which is then whipped with butter and stirred gently together. It is incredibly labour intensive, but yields a result that is incomparably smooth, light, and with the most silky mouthfeel. It is well worth the extra effort. I should also note that the equipment needed here – a candy thermometer and stand mixer – are absolutely necessary.
Italian Meringue
1/2 cup plus 2 tbsp sugar
3 tbsp water
whites from 3 eggs (between 1/3 and 1/2 cup)
Stir the water and 1/2 cup sugar together in a small heavy saucepan, using a wooden spoon over medium heat, until the sugar has dissolved. Insert a candy thermometer and watch until it registers 244 degrees Fahrenheit – the syrup will be thick and bubbly.
While the syrup is heating, whip the egg whites, at medium high speed, in the bowl of the stand mixer fitted with the whisk, adding the remaining 2 tbsp sugar when the whites become foamy.
Carefully (seriously, this stuff is molten!) pour the sugar syrup down the side of the bowl into the whipped egg whites in a very thin stream and whip at high speed until the mixture cools to room temperature. This will take anywhere between 5 and 10 minutes, depending on the weather and the speed of the mixer. It is important to whip right until it has cooled to room temperature for the meringue to be the proper consistency. When cooled, scrape the meringue into a small bowl and keep it close by.
*For the next steps, there is no need to wash the bowl or the whisk from the stand mixer. Simply use them as they are. You will, however, need to give the saucepan a good rinse in very hot water – any sugar crystals left in the saucepan will encourage crystallization and possibly give you bits of sugar in your buttercream. No need to wash with soap; just melt them off before reusing the saucepan.
Egg Yolk Buttercream
5 egg yolks
1 1/4 cup sugar
1/4 cup plus 2 tbsp water
In a repeat of the meringue method, combine the water and sugar in the saucepan over medium heat, once again watching the candy thermometer until it registers 244 degrees Fahrenheit.
Meanwhile, whip the yolks in the bowl of the stand mixer at medium low speed.
When the syrup is ready, pour it once again down the side of the stand mixer bowl in a thin stream, beating at high speed until the mixture is very thick and pale and forms ribbons as it runs from the whisk into the bowl. It is not necessary to whip this to room temperature, but since it needs to cool before being used, I always whip it to room temperature anyway since whipping hastens the cooling process. When cool, scrape the yolk mixture into another small bowl and keep it close by.
Whip 1 1/2 cup very soft butter in the bowl of the stand mixer until it is creamy and very smooth. Scrape the egg yolk mixture into the butter, whipping at low speed until the mixture is very light. Finally, beat in the Italian meringue on low speed until streak-free and smooth. *I often find a quick blitz or two at high speed is efficacious when combining these mixtures.
*If you’ve played your cards right, you have crème pâtissière ready to go immediately. If not, the buttercream can be kept at cool room temperature for up to 4 hours, or refrigerated for a day or two. If you’re using refrigerated buttercream, whip it at medium speed until it becomes very light and smooth.
Crème Pâtissière
1 vanilla bean
2 cups whole milk
2/3 cup sugar
3 tbsp cornstarch
6 egg yolks
3 tbsp unsalted butter
Pour the milk into a medium heavy saucepan. Split the vanilla bean in half lengthwise and scrape out the seeds with the back of a paring knife. Add the seeds and the bean pod to the milk. Heat the milk on medium just until it boils, then turn the heat off and allow the vanilla to infuse for 10 minutes.
In the meantime, whisk the sugar and cornstarch together in a medium bowl, then add the egg yolks. Whisk just until the sugar dissolves – you don’t want this mixture to become thick and pale.
Turn the heat back on under the milk, and bring it just to the boil. Pour the hot milk in a thin stream into the yolk mixture, whisking continuously. Pour the mixture back into the same saucepan, removing the vanilla bean pod and straining it if you wish, whisking constantly over medium heat until the mixture boils and thickens. Remove it immediately from the heat, still whisking, and whisk in the butter until it is smooth and glossy. Scrape the pastry cream into a small bowl and press plastic wrap directly on the surface so it doesn’t form a skin. Chill it completely.
Assembly
…phew. Still with me? Now we have all our components, and it’s time to put them together. Home stretch!
Crème Mousseline
Whip the buttercream at medium speed until it’s very light. (If you just made it, there’s no need to whip it again.) Add 1 cup chilled crème pâtissière and whip at low speed until smooth.
Brush the genoise for the bottom layer with half the kirsch syrup. Don’t be shy here, you really want the syrup to soak down into the genoise.
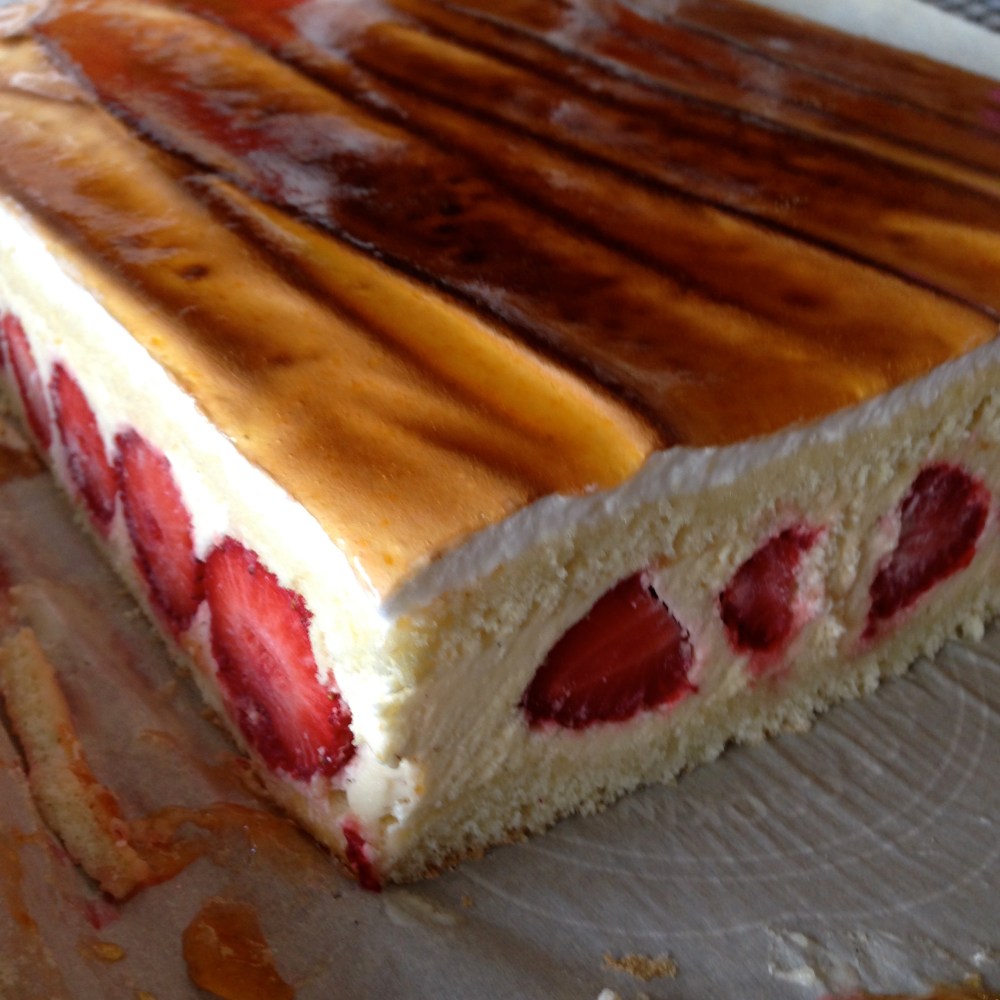
Spread half of the crème mousseline over the bottom genoise, then arrange 1 lb (2 cups) of strawberries in the mousseline, tops facing out at the sides and the rest arranged as you wish in the centre. Spread the remaining half of the mousseline over the berries and smooth it with a spatula or a spoon.
Place the second genoise gently on the mousseline and brush it with the remaining kirsch syrup. Chill the cake at least an hour, until the mousseline is well set.
Finishing Touches
French Meringue
2 egg whites
1/3 cup sugar
1/3 cup icing sugar
Whip the egg whites at medium high speed until they’re foamy, then add the sugar gradually and whip until firm and glossy. Sift the icing sugar into the meringue and fold it in gently.
Spread the meringue over the top of the cake and smooth it with an offset spatula. Brown the meringue lightly with a kitchen torch, or pop it under the broiler very briefly – and for goodness’ sake keep an eye on it.
Apricot Glaze
1 whole jar of apricot preserves or jam
2 tbsp water
Melt the preserves with the water in a small saucepan over medium heat, stirring occasionally. Strain the mixtures through a sieve into a small bowl.
Pour the glaze over the meringue (trust me – it will be fine) and smooth it with a thin spatula. Pop the cake straight into the fridge and leave it there as long as you can bear it, at least half an hour.
If you have used a cake ring now is the time to remove it…carefully. If, like me, you’d rather have some trimming to do, now is the time to put on the kettle while you grab a sharp knife and trim the edges. Use a firm hand and no sawing motions; you want smooth edges and you’ll be cutting through two layers of cake as well as strawberries.
Serve this cake sliced in narrow, genteel slices, or do as we do and slice a whole row before putting it back into the fridge. It will disappear, I promise. This cake is best if eaten within a few days.
